Building Your Home Cybersecurity Lab for Pentesting: Part 2 — Setting Up the Network Using VirtualBox and VMware Workstation
In this second part of our series on building a cybersecurity home lab, we will focus on configuring the network environment using VirtualBox and VMware Workstation. A properly configured network is essential for seamless communication between virtual machines (VMs) and provides a realistic environment for penetration testing and ethical hacking.
Configuring VirtualBox Network
Since we will primarily use VirtualBox for running VulnHub VMs, let’s begin by setting up a Host-Only Network Adapter, which acts as both a bridged network and an internal network. This allows us to create a DHCP server that facilitates communication between VirtualBox and VMware Workstation.
Steps to Configure VirtualBox Network:
Create a Host-Only Network Adapter:
- Open VirtualBox.
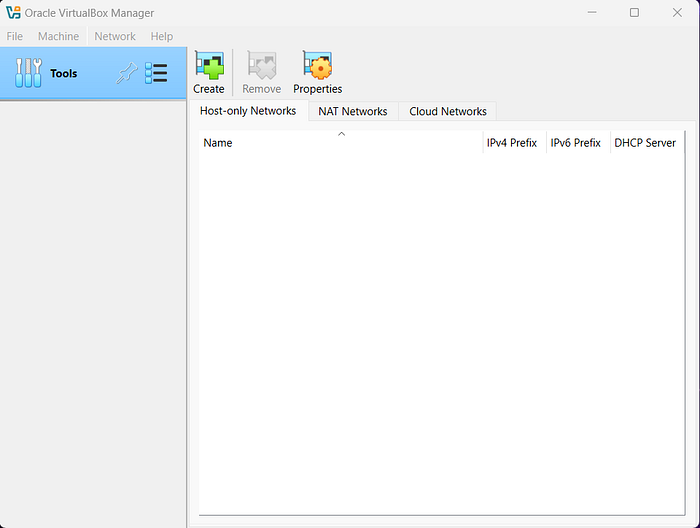
- Click on the Tools menu, then select Network.
- Remove any default configurations.
- Click on Create to generate a new network adapter.
Configure the Adapter Manually:
- In the properties section of the new adapter:
- Set the IPv4 Address (IP address for the DHCP server) to
10.10.10.2. - Choose a private IP address range:
- Class A:
10.0.0.0/8 - Class B:
172.16.0.0/16to172.31.0.0/16 - Class C:
192.168.0.0/16
For this setup, we’ll use the Class A range 10.10.10.0/24, so the addresses will be in the range 10.10.10.(0-255).
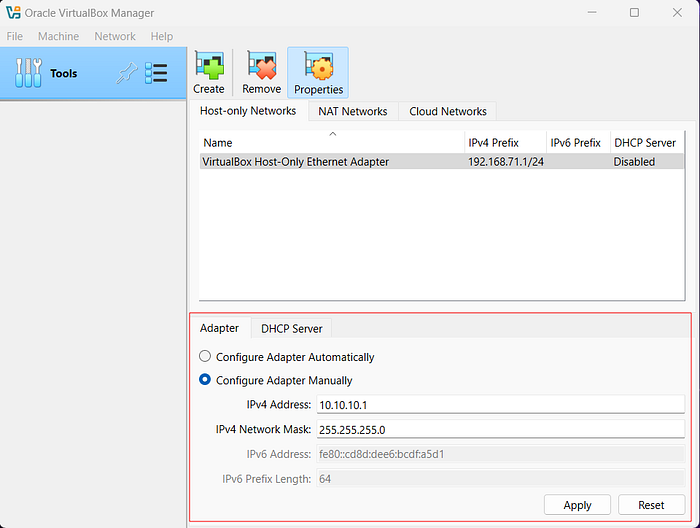
Set IPv4 Network Mask:
- Use
255.255.255.0. This ensures that the DHCP server assigns IPs within the range10.10.10.0to10.10.10.255, excluding10.10.10.2(reserved for the DHCP server).
Enable DHCP Server:
- Navigate to the DHCP Server Tab
- Check the box for Enable DHCP Server.
Set:
- Server Address (Default Gateway):
10.10.10.2 - Server Mask:
255.255.255.0
Define an IP range for simplicity:
- Lower Address Bound:
10.10.10.10 - Upper Address Bound:
10.10.10.20
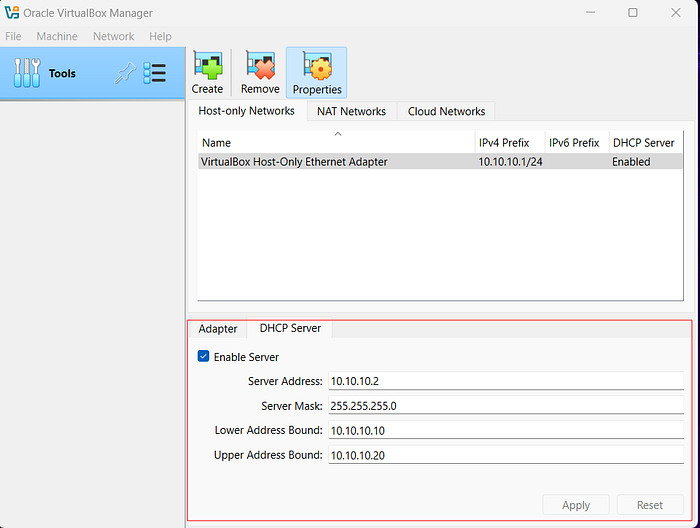
Restart windows to reflect changes on network adapter
Configuring VMware Workstation Network
To connect VMware Workstation with VirtualBox and VulnHub VMs, follow these steps:
Steps to Configure VMware Workstation Network:
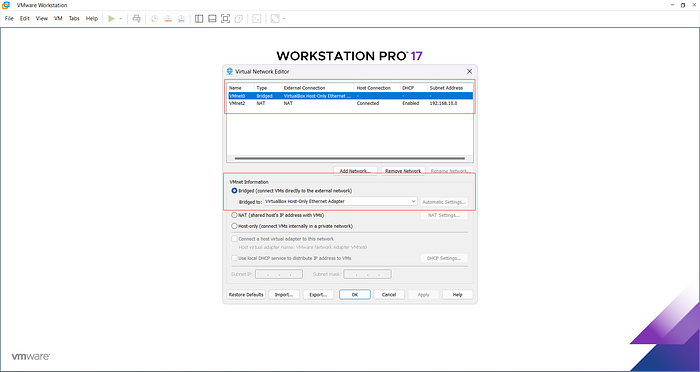
Access Virtual Network Editor:
- Open VMware Workstation.
- Go to Edit > Virtual Network Editor, then click on Change Settings.
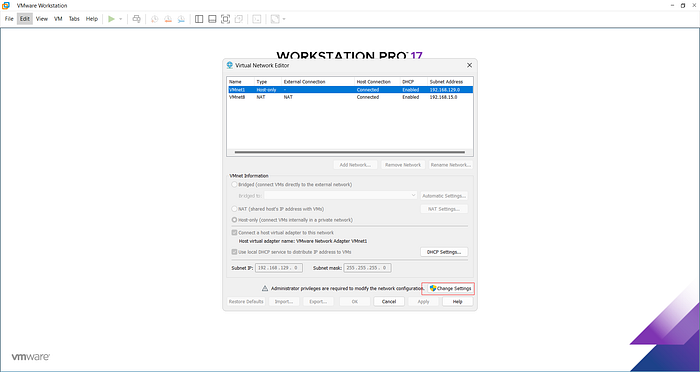
Modify Default Settings:
- Delete any default bridged adapters.
- Add a new network
- Select Bridged mode.
- Link it to the VirtualBox Host-Only Adapter created earlier.
Set Up Kali Linux VM in VMware Workstation:
- Create and install your preferred penetration testing distribution (e.g., Kali Linux).
- Once installation is complete, shut down the VM.
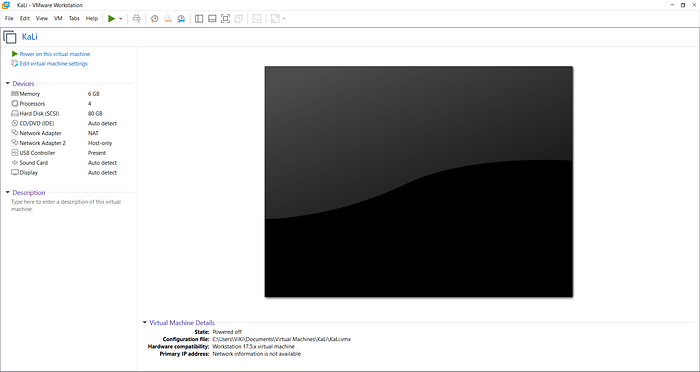
Add Two Network Adapters:
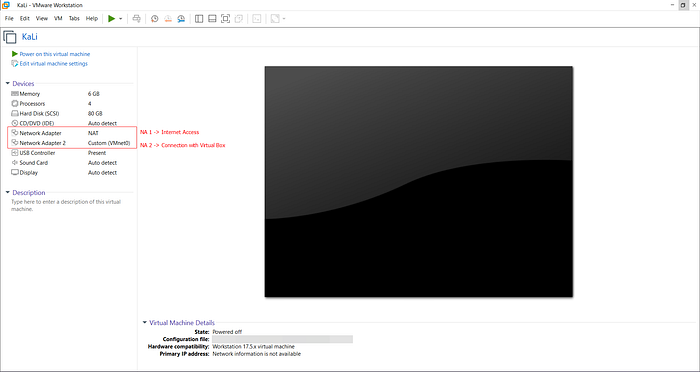
- Go to Edit Virtual Machine Settings, then add two network adapters:
First Adapter (for internet access):
- Set as Custom (NAT) (e.g., VMnet 2).
Second Adapter (for connecting to VulnHub/VirtualBox):
- Set as Custom, selecting the earlier created adapter (e.g., VMnet 0).
Restart windows to reflect changes on network adapter
Start Kali Linux VM:
- Boot up your Kali Linux VM.
- Open a terminal and type
ifconfig
You should see two Ethernet interfaces:
eth0: NAT adapter for internet access.
eth1: Host-Only Adapter with IP address in the range 10.10.x.x.
Configure Network Manager in Kali Linux (Optional):
- Add two adapters in the network manager for clarity:
- Name one “Internet” and restrict it to
eth0. - Name another “VulnHub” and restrict it to
eth1.
Verifying Connectivity
After completing these configurations:
- Your VulnHub VMs in VirtualBox should communicate seamlessly with your Kali Linux VM in VMware Workstation via the Host-Only Adapter.
- The NAT adapter in VMware will ensure that your Kali Linux VM can access external resources like internet searches during penetration testing.
Conclusion
With this setup, you now have an isolated yet functional network environment ready for penetration testing vulnerable machines from VulnHub or other sources.
In Part 3 of this series, we will explore downloading VulnHub VMs, importing them into VirtualBox, and performing initial reconnaissance using tools like Nmap within your configured network environment.
Stay tuned as we continue building your cybersecurity home lab!

